
Overview
A challenge like this had long been on my radar throughout my time at TGA.
To create a full fletched vertical slice experience, solely based on the Souls-like genre.
Elden Ring, the Dark Souls Franchise as well as Black Myth Wukong were major inspirations.
Halfway through the project, a Technical Artist, Jacob Södeström Hallberg decided to tag a long and make it a co-op project by producing VFX systems to contribute towards making the world feel more alive.
About
-
Project Length - 10 Weeks (Half-time)
-
Level Editor - Unreal 4 and 5
-
Quxiel Bridge - For props and textures
-
Marketplace Assets used:
Animations from: "AWeaponMaster"
Skybox from: "Velarion - Environments"
Targeting System Component (Plugin)
Focus Areas
-
Level Design, Blockout to final
-
Game Design, Player system
-
Boss AI Scripting
-
Lighting
-
Set Dressing
Pre - Production & Planning
Reference Material
I always tend to create a moodboard with extensive references quite early on in the process to help visualize the end product and to act as a source of inspiration.
With a wide variety of japanese themed artworks as well as multiple images from the game "Black Myth Wukong" I felt like I had a great foundation to work with.

Overview

I wanted this to be a tight and compact level and experience, this way I would be able to iterate and polish on the level substantially more than with a bigger level.
Level Timelapse
The Level

The Start
Framing the objective was the very first thing I worked with. I wanted to achieve a straight line of sight towards the end of the level.
The goal was to frame the end with the help of the composition and to use the rule of thirds to get the focal point towards the objective.
The Canal
While the canal itself was rather large and wide, I still tried to narrow it down towards the mouth to achieve a funnel and reveal for the ancient tree.
By the end of the mouth I installed a ledge to act as a one-way, invoking agency in the player to initiate the boss on their terms.

The Arena
The bossfight takes place rather early in the level.
The thought process behind this lies in a three act structure, where this particular level takes place as the last act.
This level is supposed act as the conclusion to a larger experience.

The Passage
Throughout the differnet traversal areas and passageways I try and avoid visual but also gameplay fatigue.
I utilized the 10 second rule throughout the level as I did not want the player to perform a certain action for more than 10 seconds without anything happening or anything new being introduced.
The Mountain Pass
Throughout the mountain pass I once again worked with composition to try and shift the focal point towards the objective.
With the addition of a vista and sidescene the player could stop for a few seconds and get a glimpse of the next area. This way we could foreshadow the next chapter in the story.

The Hidden Graveyard
The graveyard, a small overgrown area surrounded by dence foliage and gravestones.
This part acts as the conclusion of the level. Only a foe, worthy by defeating the boss can interact with the old ancient tree stump.
The Player
My first and upmost priority during this project was setting up the player template. The reason for this was because it was the biggest risk of wether this project would be to much of an undertaking or not. I would also benefit from being able to design the level based on the game mechanics created.
The framework was based on the Three C's, Character, Controls and Camera.

Character Controller
Step one was re-using the default ThirdPerson template in Unreal by simply swapping out the idle, walk and run animations in the one dimensional blendspace. Since the default template in Unreal did not have a sprint function I decided to add one as my animations supported it.
While this was not nessecarily the hardest thing to do I could now start tweaking the player metrics in relation to my reference games.
Step two was creating a combat stance with a circle strafe mechanic. This meant that I had to create a two dimensional blendspace instead, resulting in not only a forward vector but also a right vector to calculate the movement. To make this work I made a new state within the animation blueprint.
The important thing here was to achieve the desired effect of always having the player face the same direction as the camera.
Dodge Roll
In order to get smooth animation transitions and no animation overlapping I had to set up AnimNotifyStates for all the animations. With the help of the notification states I could create a system which would allow me to never overlap animations, unless I wanted to.
However, the dodge roll did not work at all as intented. The character would only roll in the direction the character was phasing. This resulted in a very one dimensional dodging system.
By however getting the last movement input vector and Xvector rotation I could overide the direction on the animation, resulting in a much more dynamic dodge roll.
Attack Combo
The LMB attack combo sequence consists of three different animations in an index. If the player would not attack for 3 seconds, the combo count in the index would reset.
Besides the combo I decided to add a unique attack to act as a gap closing attack. This way you could stagger the enemy in an "on hit animation". For more flexibility and agency I made it possible for the player to add the gap closing attack into their combo without resetting it.
The attack animations had to use two different AnimationNotifyStates. One to control animation overlapping and the other to handle the damage application.
I made a custom timed event to handle the damage application. This combined with my notification states allowed me to control when to trace and apply damage. This way I would not apply damage if an enemy collided with the weapon when the player was not attacking.
I had to override the attack direction as it was solely based on which direction the character was facing. Instead of being based on which direction the character was phasing, I made it so the attack direction was based on the camera direction.
Whats cool about this is that it worked perfect in conjunction with the targeting component plugin used in the project. This way I achieved a really neat circle strafing behaviour where the player attacks would always be directed towards the locked on enemy.
Health, Stamina
For the health and stamina I simply tried to recreate how souls games tackle this. Souls games rely heavily on risk and reward for their actions and I wanted to maintain that philosophy.
To prevent the player from spamming dodge, it would cost a set amount of stamina and not regain for 1 second after the animation was completed.
The attacks would also be rather expensive in order to prevent the player from just staggering the boss infinitely.
Camera
The final addition to the player was to create a more dynamic camera then Unreals default one. The camera metrics was one of the first things I narrowed down, even before I started working on the movement and attacks themselves. Despite changing the metrics I always had issues with the camera feeling rickety and over responsive. The dark souls camera is at times almost cinematic and I wanted to recreate that feeling by adding Camera Lag and a slow follow up.
No Camera Tweaks
With Camera Tweaks
The Boss
With little to no prior experience working with advanced AI, constructing the boss was definetly a major challenge. The positive side of having a Humanoid, was the fact that I could re-use a lot of the code and systems already created for the player character.

Health
First thing I did was to make sure that the AI could take damage, I essentially just made an advanced dummy with an integrated widget to track the health.
To make the healthbar pop a little bit more, I made two overlapping bars, one which directly updated and one which updated with a timeline lerp.
This made the health loss feel more impactful when hitting the enemy.
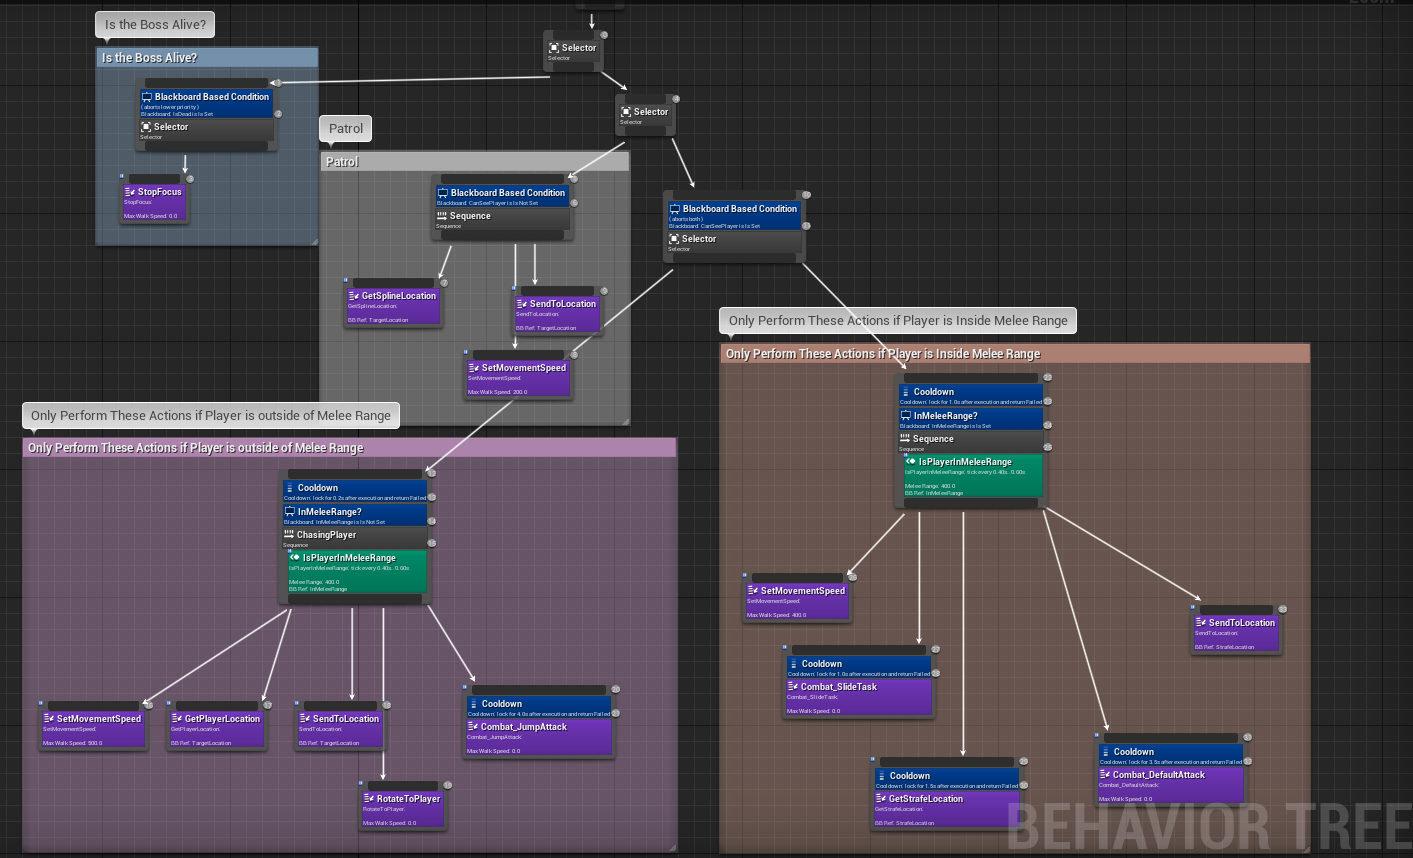
Logic & Behaviour Tree
After multiple failed attempts at creating the AI solely in Blueprints I started understanding the limitations I was facing and decided to do research on using Behaviour Tree instead. Link to full Tree
Step one was to break down the vision of my AI into more tangible chunks. By doing so I had an easier time working on the different tasks.
Movement Logic = Chase, Strafe, Dodge.
Attack Logic = Default Attack Combo, Gap Closing Attack, Special Attack.
Movement Logic
The idea behind adding the strafe and the dodge mechanic was
to add more depth and versatility to the boss. This way the AI would never stand still and think but would always have atleast one movement task to perform.
This was especially important for the flow of the combat as it caused the boss to reposition very often for different attack scenarios.
Backwards dodging was a late addition based on playtesting as it added for intriguing interactions and synergies with the gap closer attacks.
Attack Logic
The three different attack types was split up into indexes to contain several different animations, resulting in more versatility in the attack tasks themselves.
I based the three different attack tasks on the AI's distance to the player.
For the different gap closing attacks, depending on how fast they were, I after playtesting realised I had to add extra anticipation animations to foreshadow the attacks.
Damage Application & Assembly
For the damage application I re-used the same components from the character and created new notifiers. The boss was way more complex and requiered 6 different notifiers. An attack montage could look something like this for the AI.
With all the different components started, the next step was to combine everything into a functional behaviour tree.
Knowing that I had a very structured character my biggest goal was to create a scalable and readable system which in itself would provide great ease of access.
A few clips of the AI and Combat in action
The Art
Being a vertical slice project I wanted to push the level to the visual quality I had originally invisioned. With the help of Jacob, the TA I'm cooperating with, we were also able to add interactive VFX systems to the world which would further add to the polish.
Establishing the Asset Gym

Pretty much all assets besides the custom Torii Gate (Sketchfab) came from the Quixel Library.
I had tweak every single asset to fit together more seemlessly by adjusting the Albedo and Roughness values.
I also made a custom Dither Temporal AA shader to the master material in order to blend meshes together.
Performance was also a huge issue. I had to work closely with LODs to maintain a high framerate throughout the level.
Working with Jacob
To make the world feel more alive and interactive I teamed up with a fellow Technical Artist named Jacob Söderström Hallberg.
-
Dynamic Ground Leaf VFXs that interacted with both the player and boss.
-
Falling Leaves VFX.
-
Fireflies that interacted with the environment.
-
Interactive Water with ripples and splashes.
Link to his Portfolio: Jacob-Adam.com
Final Screenshots


Closing Thoughts
This project was a real joy to work on. First and utmost I learned so many new things.
The project however wasn't all smooth sailing. There were multiple times where I really struggled with not only the player character but also the boss and the level.
The biggest reason for making my own player from scratch was due to the fact that I wanted full control over all of my systems. Even then, I at times struggled to piece everything together and I really have to put emphasis on how important it is to have readable and accessible systems and functionality.
Especially on a project this big I realised the importance of having constant feedback. It is really easy to go full tunnel vision mode after several weeks on the same project.
This is why it was so great working with Jacob, even though Jacob primarily did VFX for the project it was always a pair of fresh eyes on everything. Without all the amazing feedback from teachers and classmates I would not have been able to put all this together.